Step by Step Guide to Add Google Search Console in Shopify Store


Did you know that organic search is the top traffic source for Shopify stores? It beats other channels hands down, based on data from over 60,000 shops. This means you need to closely monitor your SEO performance and make adjustments to boost your traffic and sales.
Enter Google Search Console (GSC). This tool helps you track, analyze, and optimize your site’s presence in Google Search results. You can even use it to identify and fix technical issues that might be hindering your site's visibility.
Let’s take a closer look at GSC and how you can add it to your Shopify website.
What is Google Search Console?
Google Search Console is a free tool Shopify store owners can use to track how their store appears in Google searches. You can use it to learn how Google views your site and understand how it ranks, as well as:
- Spot errors and technical issues
- Check indexing status
- Identify broken pages and errors
- Analyze site visibility and performance
However, GSC solely focuses on organic search results from Google. If you need insights on paid ads or performance on other search engines, you’ll need to use additional tools.
How to Connect Google Search Console to Shopify
You can link your Shopify store to Google Search Console by verifying either your domain or a URL prefix. The domain method involves DNS changes. The URL method is simpler and involves adding a meta tag to your store’s HTML. Below are the steps to follow:
Step 1: Sign In or Create a GSC Account
Go to Google Search Console and log in with your Google account. If you don’t have an account, create one on the Google sign-in page.
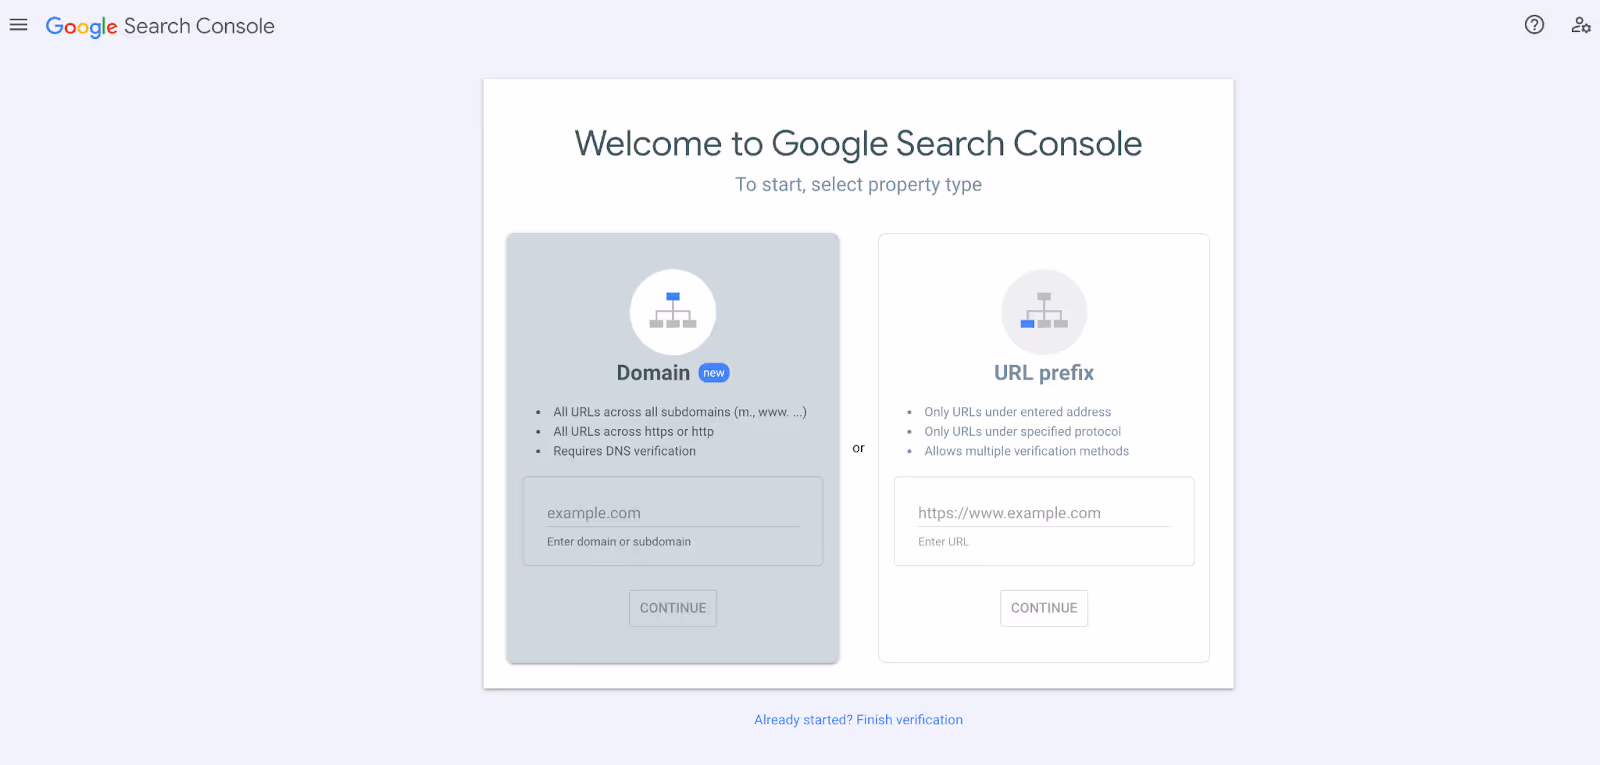
Step 2: Add Your Shopify Store
Click the “Add Property” button to start a new property. Choose the URL Prefix option, type in your Shopify store’s homepage URL, and click “Continue.”
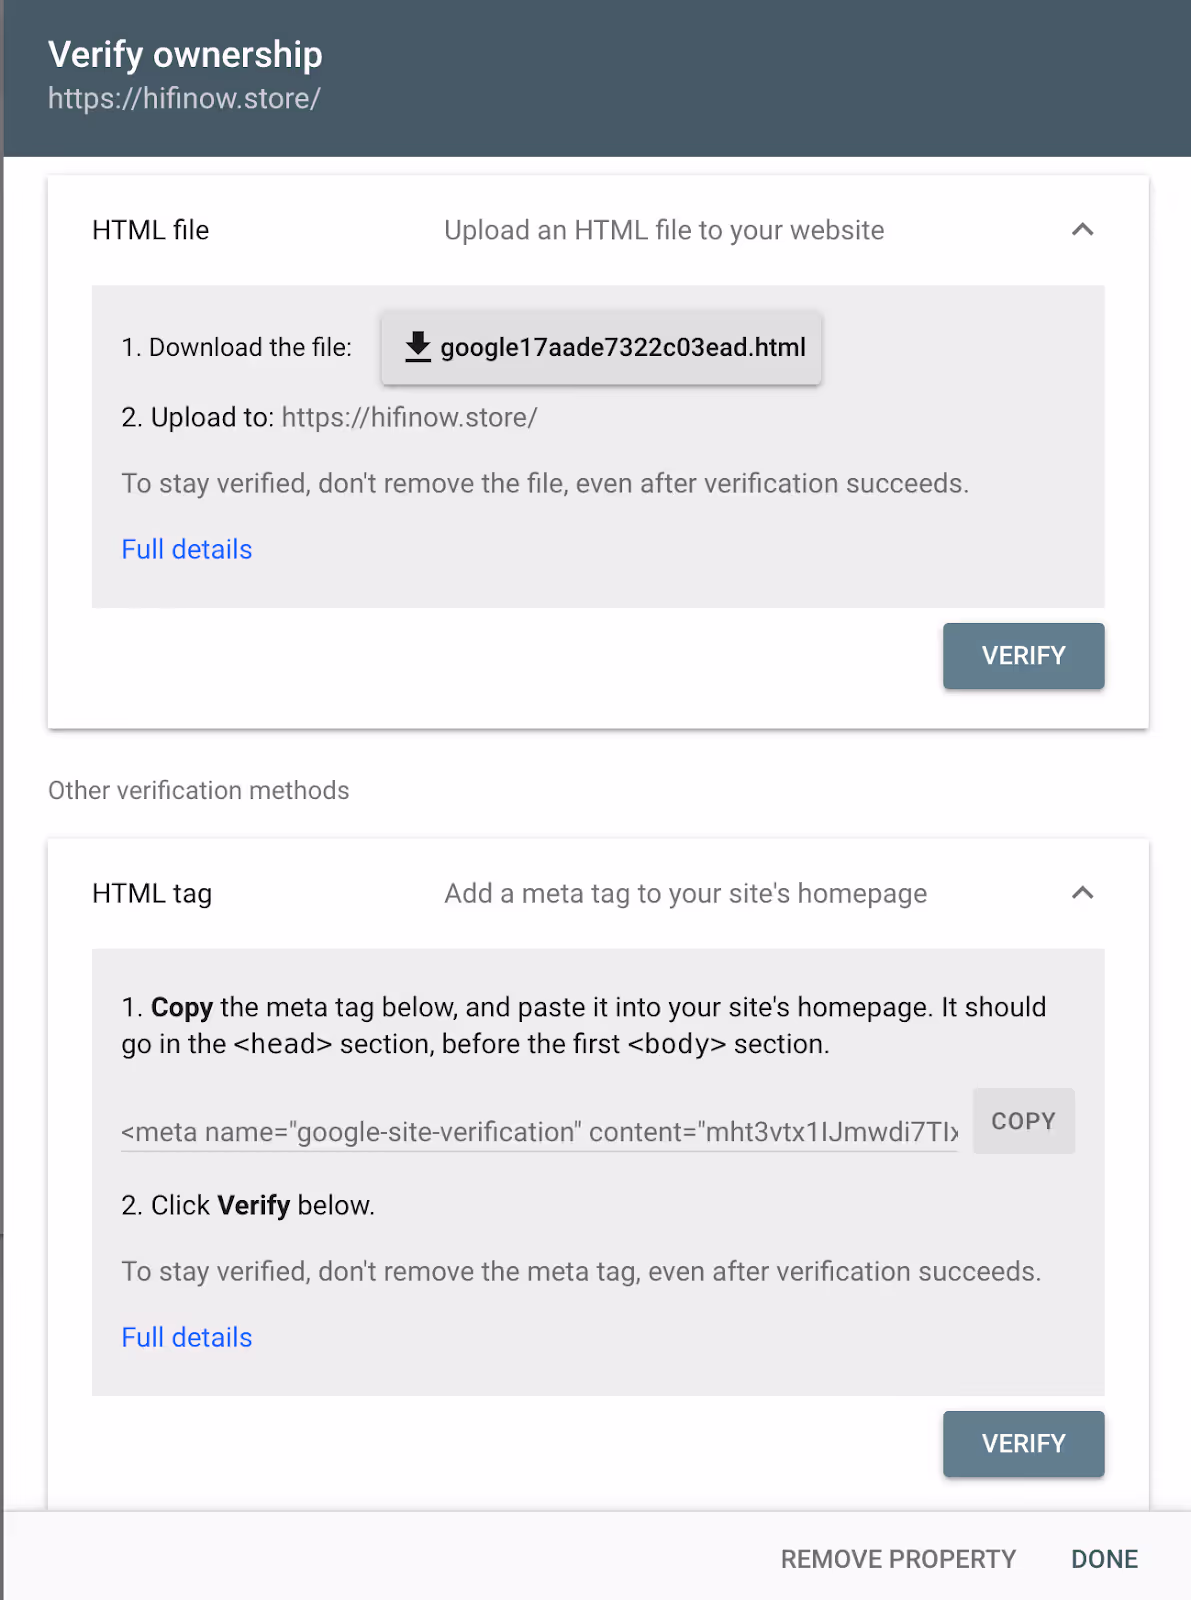
Step 3: Copy the HTML Meta Tag
In the verification methods, select “HTML tag” from the “Other verification methods” list. Copy the meta tag provided by GSC.
Step 4: Open the Shopify Theme Code
Log into your Shopify admin panel. Go to Online Store > Themes. Click on the three dots next to “Customize” and choose “Edit code” from the dropdown menu.
Step 5: Backup Your Shopify Theme
Before making changes, it's a good idea to create a backup. Click the three dots next to your current theme and choose “Duplicate.” This saves your theme in its current state, so you can revert back if needed.
Step 6: Edit the theme.liquid file
In the theme code editor, locate the theme.liquid file in the left-side menu. Open it and paste the HTML meta tag before the closing </head> tag. Click “Save” to update the file.

Step 7: Verify in Google Search Console
Return to Google Search Console and click “Verify.” If successful, you’ll see a confirmation message saying your ownership is verified.
Note: Make sure your Shopify store isn’t password-protected, as it must be accessible for Google to verify. If you change your theme or buy a new domain, you’ll need to repeat these steps to re-verify your site.
Submitting Your Sitemap to Google Search Console
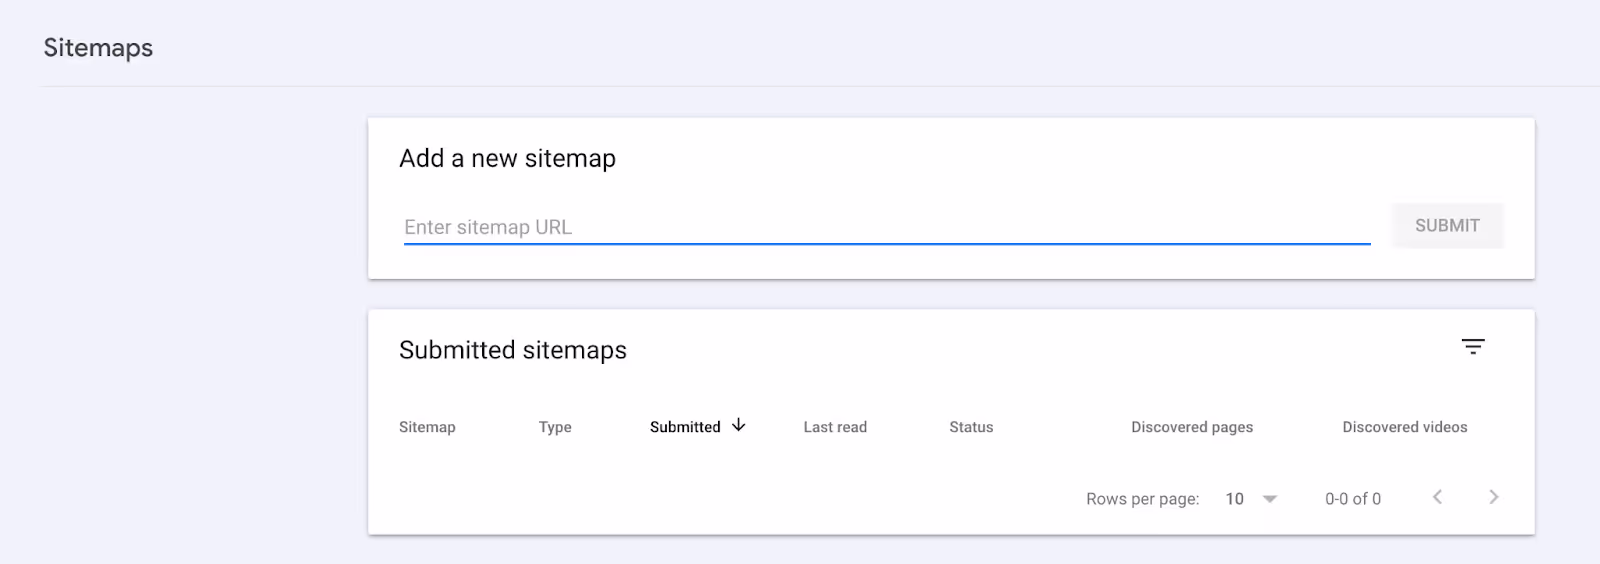
- Click the “Submit” button after entering the URL.
- Stay on the page briefly to make sure Google doesn’t report any immediate problems. If there are issues, Google Search Console will typically offer tips on fixing them.
- Google will process your sitemap and start crawling the URLs. This can take from a few hours to several weeks. You can monitor the status in the “Sitemaps” section.
Linking Google Search Console and Google Analytics
Sign in to Google Analytics and pick the website you want to link. Go to Admin, then Property Settings, and choose All Products. Find ‘Search Console Links,’ click on Link, then select the appropriate domain and confirm. Add your site from GSC, choose Web Stream, and finalize the changes.
What Are Owners in Google Search Console?
Owners have top-level control over a property in Google Search Console. They can see all data, tweak settings, add or remove users, and even delete the property.
There are two types of owners: verified and delegated.
Verified Owners
These folks have confirmed their control over a property by going through the verification steps. This usually involves editing the website or DNS, showing they have full access and authority over the property.
Delegated Owners
These are added by verified owners. They get similar rights but don’t go through the initial verification process themselves. They can be removed by the verified owners whenever needed.
Users
Owners can add users with different levels of access. There are full and restricted users:
- Full users. They can view almost all the data and make simple SEO changes like submitting sitemaps. However, they can't add new users or change settings.
- Restricted users. As the name says, they have limited access. They can see most of the data but can't make changes or add users.
Always give only the necessary level of access to keep your account safe. This prevents accidental or unwanted actions like deleting your property or removing important URLs from search indexing.
Key Tips for Using Google Search Console with Shopify
You’ve added Google Search Console to your Shopify store. Here’s how to make the most of it.
Monitor Your Traffic
In the ‘Performance’ section of GSC, you’ll find detailed information on how your store’s pages are performing. It shows clicks and impressions over time, helping you understand which pages are attracting visitors. The ‘Pages’ tab provides a list of URLs with their traffic metrics. Filtering these results can give you a clearer view of what’s working—whether it’s product pages or collections.
Discover Top Keywords
The ‘Queries’ report highlights the search terms bringing visitors to your store. This information helps you understand what keywords are driving traffic and adjust your SEO strategy accordingly.
Improve User Experience
The ‘Experience’ tab offers insights into user interactions and site performance. It includes:
- Page experience: Here, you’ll find metrics like First Input Delay (FID) and Largest Contentful Paint (LCP) that affect how users perceive your site.
- Mobile usability: Shows if your site is mobile-friendly, highlighting any usability issues on smaller screens. Making sure your site performs well on mobile can improve user satisfaction and retention.
- Core Web Vitals: This section provides details on loading times, interactivity, and visual stability of your pages.
Fix Site Issues
Submit your sitemap to help Google understand your site’s structure. Use the ‘URL Inspection’ tool to check how Google indexes individual pages. This tool shows if a page has been indexed, highlights any errors encountered during crawling, and provides the last crawl date. Regularly inspecting your URLs ensures that your content is visible to search engines.
Analyze Performance
The ‘Performance’ section lets you see overall trends in how your store’s pages are performing. You get an overview of both clicks and impressions for various URLs. Use this information to identify which pages are popular and which might need improvements to attract more visitors.
Ensure Mobile Friendliness
With many customers browsing on their phones, going through the ‘Mobile Usability’ report is a no-brainer. This report indicates how well your site works on mobile devices. If there are issues, you’ll find specific details on what’s wrong and how to fix it.
Understand Visitor Locations
View the ‘Performance’ report to break down traffic by country and see where your visitors are coming from. Use the information to adjust your marketing strategies based on geographic insights. For example, you can optimize shipping options and tailor your promotions to different regions.
Identify Seasonal Trends
Set the Date filter to 12 months to analyze traffic patterns over time. Look for peaks and troughs in clicks and impressions. Identifying these trends can help you prepare for seasonal increases in demand.
Detect Keyword Overlap
The ‘Pages’ report helps you spot keyword cannibalization, where multiple pages compete for the same search terms. This overlap can dilute your search visibility. Use this report to identify and adjust pages that might be inadvertently competing against each other.
How to Fix Google Search Console Errors in Shopify
You’ve got Google Search Console set up for your Shopify store. Here’s how to tackle some typical issues you might face.
Pages Not Showing Up in Searches
If a page isn’t indexed, it won’t appear in search results. Go to the Overview section to see the indexing status of your URLs. Enter any missing URLs in the Inspect tool and hit “Request Indexing.”
Problems with Redirects
Redirect errors happen when links don’t take visitors where they should. Find these in the Pages report. Fix them by correcting the URL structure in your Shopify admin.
Page Not Found Errors (404)
404 errors occur when a page can’t be found, frustrating users. Update broken URLs and set up proper redirects in the Shopify admin to resolve this.
Excluded by “noindex”
Pages marked with a “noindex” tag won’t be indexed by Google. Sometimes it’s deliberate, but other times it’s a mistake due to server settings or robots.txt file. Remove the tag in your Shopify admin to allow indexing of these pages.
Link Google Search Console with Google Analytics 4
You can also connect Google Search Console with Google Analytics 4 to ensure smooth data flow and gain deeper insights into your Shopify store's performance. For those who aren’t aware, this integration helps both tools exchange valuable data and aid in performance analysis.
Before starting, make sure your Google Analytics 4 setup is complete. Once GA4 is properly set up, follow these steps to link it with Google Search Console:
- Access your Google Analytics 4 account and select the relevant website.
- In the ‘Admin’ menu, click on ‘Property Settings.’
- Locate ‘Search Console Links’ and select ‘Link.’
- Click on ‘Choose accounts’ and select your domain (property). Hit the ‘Confirm’ button.
- Input the main URL from your Google Search Console account. Ensure the domain matches for proper integration.
- Pick your Web Stream, review the integration details, and submit the changes.
You’re done. This connection allows Google Search Console and Google Analytics 4 to share data seamlessly, providing you with more detailed insights into your ecommerce performance.
Conclusion
Adding Google Search Console to your Shopify store provides valuable insights into your site's performance in Google Search. With these insights, you can optimize SEO, fix any issues, and better understand visitor behavior. It can even help you identify opportunities to stay ahead of your competition. So, set up GSC, leverage the data, and take your Shopify dropshipping to the next level.
Adding Google Search Console to Shopify FAQ
How do you claim Google Search Console via DNS in Shopify?
To claim Google Search Console using DNS in Shopify, go to Google Search Console, choose ‘Add Property,’ and select ‘Domain.’ Follow the instructions to copy the DNS verification code. Then, add this code to your domain provider's DNS settings. Verify in Google Search Console.
How to verify Google Search Console in Shopify?
To verify Google Search Console in Shopify, log in to Google Search Console, add a new property using your store’s URL, and choose the HTML tag verification method. Copy the tag and paste it into your Shopify theme’s header, then click ‘Verify’ in GSC.
Where to add Google Search Console code in Shopify?
Add the Google Search Console code in Shopify by accessing the Shopify admin panel. Go to Online Store > Themes, select ‘Edit code,’ open the theme.liquid file, and paste the HTML verification code right before the closing </head> tag. Save your changes.